What do you mean there's no "garbage man??"
Are the exact words that go through people's heads when they move to a rural area in the sticks. And it's true, there's no magical garbage man to take your trash away once every week.
So what am I supposed to do with all this garbage?
Enter the magic of the burn barrel! That's what we're going to go over today, and while the burn barrel is a great tool to get rid of a lot of your waste, it's not what you should use for every ounce of garbage you produce.
We'll go over all the ins and outs of how to make a burn barrel at the end, but first we should cover- what should be burned in it, where you can get a burn barrel specifically made for burning trash, and a few other things you might not know.
So strap in!
What You'll Need to Make the Burn Barrel
- Metal 55 Gallon Barrel
- Drill
- Shovel
- Metal Grate
- Cinder Blocks (Optional)
Burn Barrel Basics
A burn barrel is basically exactly what it sounds like, it's a barrel/55 gal drum, that you burn your trash in to make it easier to get rid of. This a pretty widespread tactic used by people living outside of the reach of city dumps, but can also be used by those living within city limits as long as you follow the rules. Check with your city counsel for that bit of information.
What to Burn in a Burn Barrel
The things you want to put in your barrel are the things you would put in your trash can normally. Minus large plastic containers like laundry detergent containers.
So scraps you wouldn't feed your animals, food wrappers, small plastics, and other items like that. If you have a compost pile, which everyone should, you should put the biodegradable stuff in it to get the most out of your money.
DO NOT PUT LIGHTBULBS, COMBUSTABLE CHEMICALS, AEROSOLS, OR OTHER HAZARDOUS WASTE IN THE BARREL.
How to Use a Burn Barrel
This section shouldn't be skipped, as most people make the unfortunate mistake of "winging" the operation of their burn barrel and making a smelly and smoky mess. So save yourself the headache and educate yourself.
First of all, you need to burn your trash one bag at a time to avoid making smoky trash.
While the purpose of the burn barrel is to get rid of all your trash without relying on someone else to come and get it, you need to do it responsibly. And that means being patient and putting one bag in the burn barrel at a time. It burns hotter like this anyway, so it would probably take the same amount of time to effectively burn all the bags at once as it would to burn the bags one at a time.
Next you'll want to AVOID ACCELERANTS LIKE GASOLINE.
While this will get the burn going a little bit faster, it's just not a safe practice to get into, and as referenced in Commonsensehome post about this topic, it's a liability to suggest something that dangerous.
But using newspaper and dried woods to start the fire is perfectly fine! As mentioned in common sense's post, it's something that's regularly used to get these fires going.

4 Steps to Make a Burn Barrel
Finally, the topic you actually came here for! Making a burn barrel doesn't have to be a huge pain in the butt, and making one that burns well and lasts forever isn't hard at all either. So we're going to give you our take on how to assemble your burn barrel.
We don't claim to have everything down as a master when it comes to this topic, but we've practiced enough to know that this way works and it's effective!
1. A Unique Twist on Burning
Most people will set their barrels on cinder blocks or have custom metal rigs made to get the perfect air flow and clearance. But we feel like the real solution is staring us all in the face, use the Dakota Fire Hole method to create a focused blaze that pulls air in and forces flames up!
I'm sure you know the basics of a dakota fire hole, but we can briefly recap for those that might still be staring at the screen with questions.
If you can, you'll want to put this hole on the edge of a steep hill, you'll see why soon.
The basis of how this trick works is to dig a hole, in this case you'll want to make it roughly 4 inches smaller in circumference than the barrel, and you'll dig about 1 ft. down to make a cylinder shaped hole. Now the next part is a bit tricky. You'll then dig a hole roughly 2 feet away from the larger hole, this hole will go down and then connect with the larger hole. This is why you want to dig this on a hill if possible.
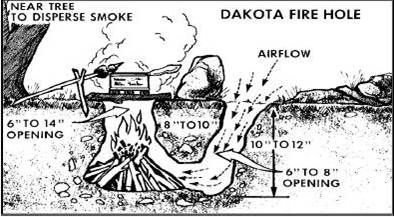
And there you have it, a dakota fire hole! This method force feeds the fire into a roaring fire, by forcing the airflow in through the hole and the only place the heat has to go is straight up the burn barrel.
2. Poke Holes in Your Barrel (Make it Fun)
This is either where the hand drill or hand gun will come in very handy! Either way you do it you need to make sure that the holes are spaced out and follow a pattern similar to the one below.
These holes allow more air to fan the flames and build the heat. If you're using the dakota fire hole method this might be a little overkill, but it's up to you, maybe you just want to shoot something. Either way, there you have it!
3. Prepare Your Bottom
Bottom of the barrel that is...
Again if you're using the dakota fire hole technique, this is for you, if you're not then you'll need to put the barrel up on cinder blocks with ventilation underneath it, but keep the bottom with holes. However, if you're doing it the fun way with the fire hole, you'll need make some alterations that will make life easier once you're done. LESS CLEAN UP IS BEST!
And to make for less clean up you want the ash and smolders to fall out of the bottom into the fire hole. So to make that possible you'll need to take the bottom out of the barrel however you see fit to do so. Next, if you have a heavy duty grate or pipes that won't melt above the heat, you'll lay those down over the hole.
You might need to dig the pipes into the ground to prevent the barrel from rolling 😉
This way the trash is burned up and the ashes can fall out of the barrel, meaning less corrosion, longer lasting barrels, and most importantly there's no clean up!
4. Light it up!!!
This is the moment you've been waiting for, time to light this sucker up!
Load the dried wood/newspaper in the bottom of the hole or barrel, stack some dense wood on top (american beech, apple, or iron wood), strike the match and let it burn!
Place the trash on top and there you have it folks, in a few minutes your trash that took up a whole trash bag will be reduced to around a pound of ashes. And God is good.
Share to Pinterest


